This is our second generation snowman army. The first generation fought a brave fight for 2 years but ultimately were not up for the task. For details on those original snowmen, check out LED Snowmen but we wouldn’t recommend following that design.
The new snowmen are constructed with a welded stainless steel skeleton, a nylon fabric uniform, and LED strips running up the middle. We are very pleased with how well the snowmen turned out and we hope they will last for many years. On the plus side, it was a fun opportunity to learn some new welding skills, as well as hone our talents with the sewing machine. On the other hand, the snowmen took an insane amount of time to build. All told, we easily spent more than 100 hours between the two of us, primarily in the metal working and uniform making categories.

Building the Skeleton
The snowmen skeletons are constructed from 3/16″ 304L stainless steel round bar. We did some early prototyping to experiment with both 1/8″ as well as 3/16″ rod sizes and the 3/16″ definitely gives a stronger skeleton. We actually originally were planning on a hybrid approach of using the thicker material for the rings and bottom ribs and the thinner material for the ribs of the top two sections, but it ended up being cheaper to acquire the thicker material so we went with that.

Acquiring and Preparing the Metal
The stainless steel rod comes in 12′ lengths. We acquired the few rods needed for prototyping from a chain store called The Metal Supermarkets. The prices there are more expensive than some other stores, but they have no minimum purchase quantity so it was great while we were still figuring things out. When the time came to purchase the materials for the remaining 11 snowmen, we called around to various local metal suppliers and went with the one that had the best price. For some unknown reason, we were able to get a better price on the 3/16″ material than on the smaller 1/8″ material so we went with that for the entire skeleton. The thicker material ultimately makes a stronger frame so we were quite happy with that pricing situation.
We ultimately purchased 30 additional rods of stainless steel (on top of the 4 we purchased originally for prototyping), which cost $233.44. At the end, we had 3 rods left over because we were able to use material a bit more efficiently than expected and we wanted a few on hand in case something went wrong.
When we picked up the rods, they were covered in a greasy substance, presumably to prevent rusting. The irony here is that the rods are stainless steel and thus won’t rust but perhaps this treatment is done by default to all metal from the supplier. We used an off-the-shelf degreaser from Walmart to remove the grease and that worked pretty well. We also learned, way too late, that we should have worn gloves while using the degreaser. It left our fingertips with a very weird texture for the next hour or so but ultimately they went back to normal. Here’s a public service announcement to always read the instructions carefully BEFORE using chemicals!
Rolling and Cutting the Metal
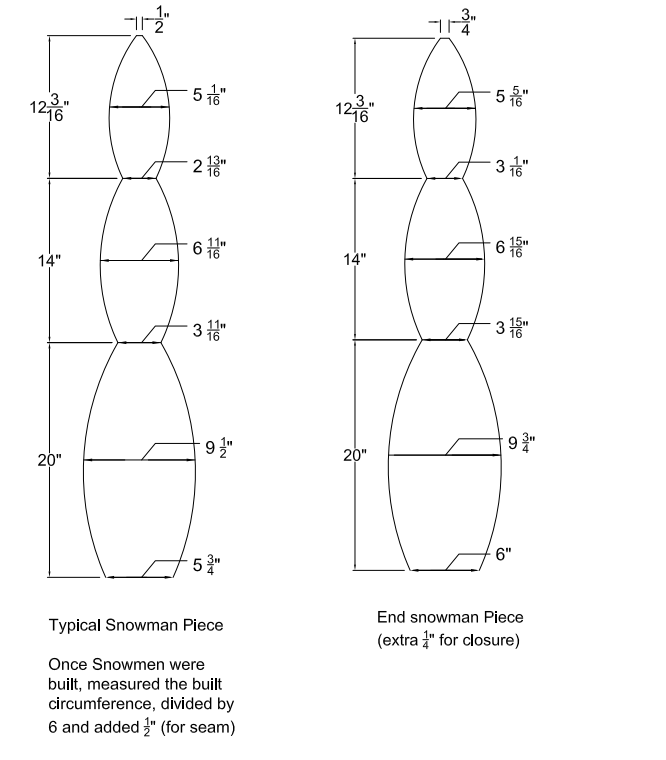
Rose used CAD to draw up a scaled diagram of the snowman skeleton and determine the correct diameter to which we should roll the metal to create each of the hoops and ribs. She also calculated the lengths of each piece and this served as our guide for the next step.

We purchased a “planetary ring roller” from Harbor Freight for about $70 dollars (painful but we really needed the tool to do this well) and used this to roll the metal into hoops of appropriate sizes. The quality of this tool was definitely questionable and we had multiple issues with it (missing cotter pin for attaching the handle, highly imprecise controls for setting ring diameter, adjustment knob breaking twice, adjustments “slipping” over time, frame cracking significantly, inability to roll rings down to the smallest diameter advertised on the box) but it did serve its purpose. If we had to do it again, we might splurge on a more expensive but higher quality tool, though it really isn’t something we have use for beyond this project.
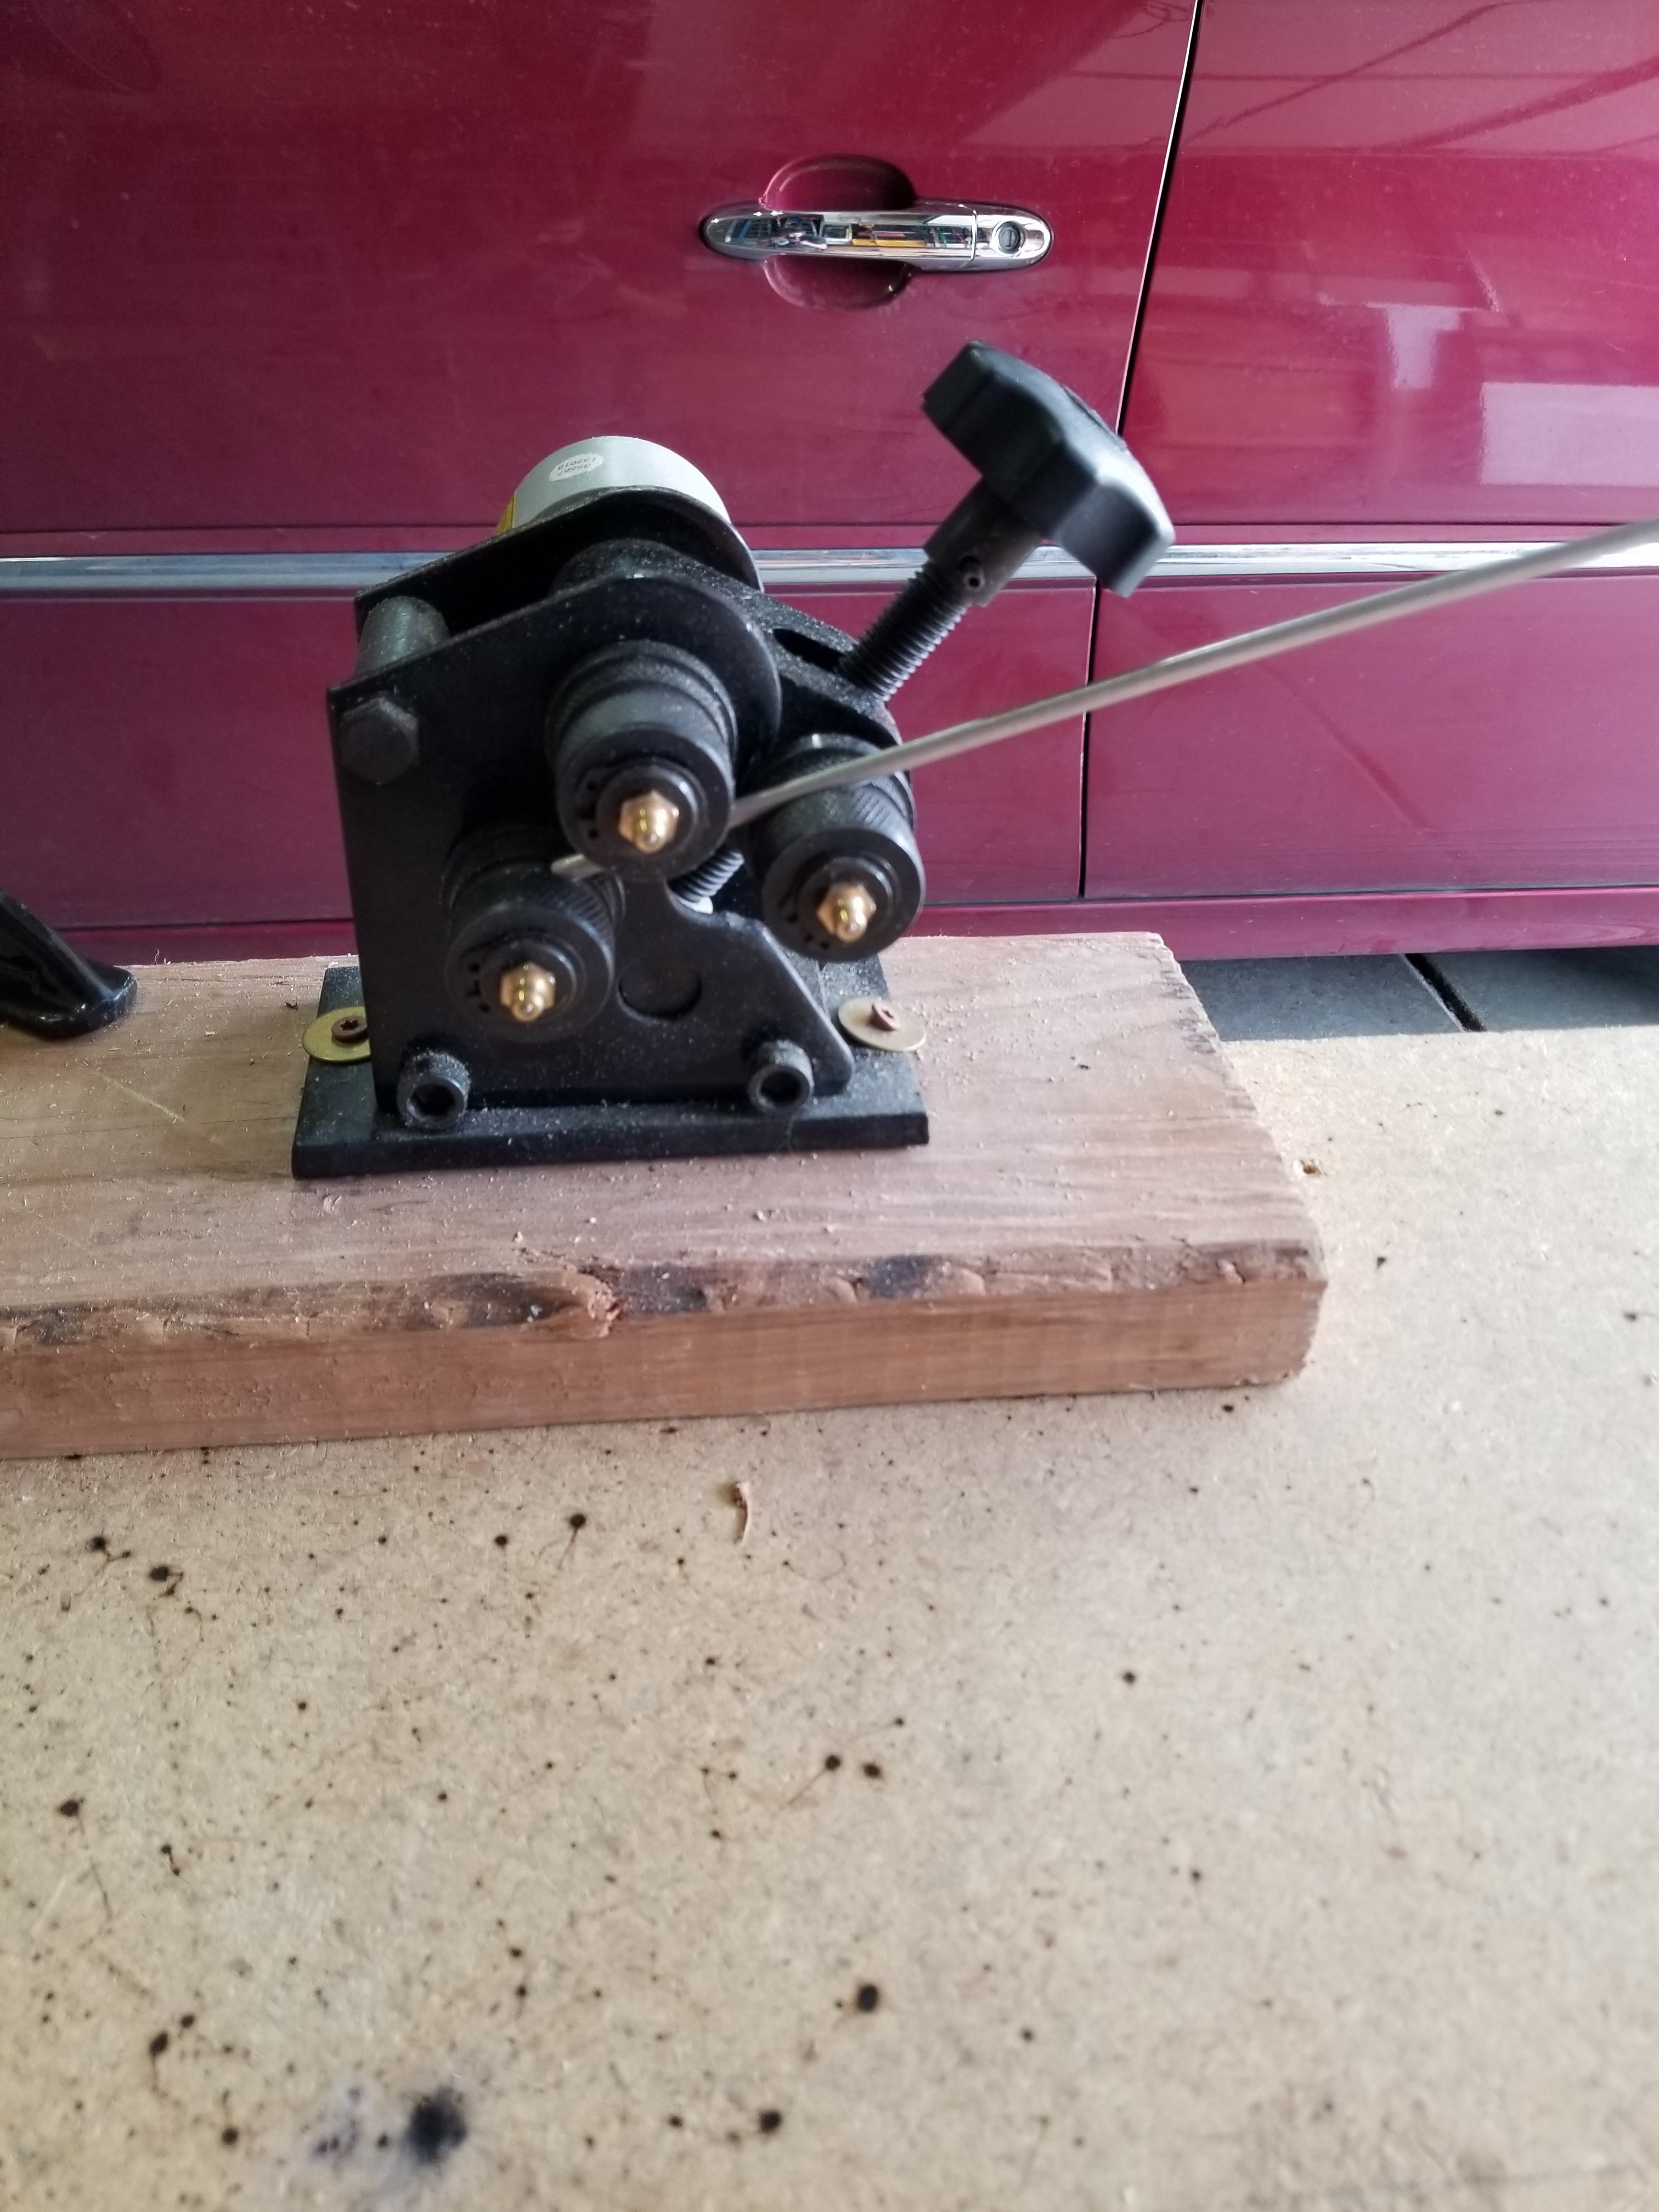
To do the actual rolling of the hoops, we turned the adjustment knob a few times and then fed all of the rods through to give them a bend. We then adjusted the knob a bit more and fed all the rods through again, turning them into loops with very large diameters. We repeated this process dozens of times, shrinking the diameter of the hoops with each pass. When we reached the diameter needed for the largest of the pieces, we set aside the correct number of rods and then kept going with the remaining set. We ultimately ended up with hoops of 6 different sizes, from which we could cut the necessary snowman skeleton pieces.

As alluded to above in the issues related to the “cheap” ring roller, we were unable to roll the final pieces down to the needed small diameter for the snowmen’s necks. We got close but ran out of adjustment room in our rapidly deteriorating tool. We ultimately solved the problem by cutting the rolled rod down into the correct lengths and then using Phil’s brute strength to bend the piece into a hoop of the correct diameter. They aren’t perfect circles (more like ovals or squares depending on the piece) but are certainly adequate for this project. We should also mention that the ring roller tends to leave the first 2 inches of the rod less curved than the rest because of how this portion is fed into the tool. Again, for this project, it really doesn’t matter. If it bothers you, you can always trim off those sections, though be careful to plan out the number of pieces you expect out of each 12 foot rod and make sure not to leave your last piece shorter than intended.
With rolling complete, we then used an angle grinder to cut pieces of the correct length out of each hoop. This left us with a small mountain of curved metal sections…with sharp metal burrs on the ends. We used a bench-mounted grinder to deburr the edges, which worked well. With this preparation work complete, it was time to weld!

Welding Snowmen Skeletons
Neither of us had ever welded before so this was a fun excuse to learn a new skill. We borrowed a Lincoln Electric Weld-Pak 3200 HD welder from one of Phil’s coworkers and got started. We used InnerShield NR-211-MP welding wire to make the welds.
The first step was to weld into a circle the pieces that make up the base, the waist, and the neck. With its large diameter, the bottom section was easy to manipulate by clamping one side and pulling the other side into contact to be welded. The waist ring was more challenging and fought being pulled into a circle much more fervently. Ultimately, by making a “jig” by driving screws into the workbench in a circle just larger than the desired diameter, we were able to work the metal into the correct shape and get the ends to touch so they could be welded. The neck section fought the hardest of all. Phil eventually abandoned hopes that they would be perfect circles and bent the metal by hand into whatever circle-like shape he could to get the ends to touch. Given that this is an internal structure that won’t actually be seen, it’s close enough.
With the three circles complete, we next assembled the head sections. To ensure good spacing of the “ribs” that comprise the head, we first used a sharpie to mark the attachment points on the neck 60 degrees apart from each other. We then welded on the large “double” section, followed by attaching the 4 other ribs to complete the head.
We built the bottom balls next, leveraging a wooden jig we created while working on the protoype snowman (heretofore known as “Proto”). The jig helps ensure that the bottom ring and waist ring stay correctly positioned both vertically and laterally. Again, we also made sure to mark the rib attachment points on both the bottom ring and waist ring to make sure the spacing looks good. When we built Proto originally, we did not pay enough attention to the spacing of the ribs and he definitely doesn’t look as good as the other snowmen. In particular, it is noticeable when the ribs of the head don’t line up with the ribs of the abdomen don’t line up with the ribs of the bottom ball.

With bottom balls and heads complete, the last assembly step was to attach them together with the middle ball ribs. Again, we leveraged the wooden jig to ensure correct alignment and this worked fairly well.
Once the snowmen were complete, we added a short (1″) piece of metal from our scrap pile to the underside of the skull to keep the light stick centered (more on the lighting below). Then it was time to use the angle grinder to clean up every one of the welds and remove any slag from the welding process. This also revealed where we had weak welds that needed touching up.
The final step for the skeletons was to spray paint the welds with a clear coat to prevent rusting. While the metal rods are stainless steel and won’t rust, the welding filler material is ferrous steel, which does rust. Covering the welds from all sides with this clear coat should prevent them from rusting and staining the white uniforms.
While on the subject, we briefly investigated using a stainless steel welding material. The internet seems to indicate that a product does exist, but reviews are mixed (erring on the negative) and it has not been around for very long. In short, it is much harder to get good quality welds with a stainless steel filler metal. Given that we had never welded before this project, we decided to set ourselves up for success with easier welding and use the clear coat at the end to prevent rust.
Making the Uniforms
Getting Materials and Creating the Cut Templates
The snowmen’s uniforms are made out of an outdoor nylon fabric that we purchased from Jo-Ann Fabrics (LGST Sport Nylon White 714045002874). It is similar to “rip stop” fabric, but doesn’t have the actual grid pattern that stops rips from happening. We purchased about 15 yards of the fabric at a price of $4 per yard (originally $8). Jo-Ann was running a sale to get any one item at half price and we were pleasantly surprised to find that applied to fabric by the yard as well so we had more than enough fabric for all 12 snowmen for $65!
Each uniform is made of 6 vertical panels of fabric. Rose used CAD to create two templates for cutting the fabric and printed them out to scale. One template is used for the center 4 of the 6 panels for each snowman. The other template is a slight bit wider, and is used for the two end panels of each snowman. The extra width allows room for installing snaps and for the overlap of the fabric when snapping the ends together.
One important note: a week before going live with the show as we were setting up the snowmen, we discovered that we had actually purchased two slightly different fabrics. Both were the same price and looked identical on the bolt at the store (and Philip never noticed while cutting or sewing), but one is a bit thinner than the other. We now have some snowmen with panels of each type of fabric. Fortunately, it does not seem to actually matter and we can’t tell the difference in the materials when the snowmen are illuminated (potential disaster averted).
Cutting the Fabric
We quickly learned that the nylon fabric is not the easiest material to work with and very quickly dulls the blades used to cut it. Rose cut the uniform for Proto using a $5 fabric cutting wheel and the wheel was dead by the end of the 6 panels. Since adding $5 per snowman in cutting wheels was not part of the budget, we switched to scissors for the remainder of the panels and went through at least two pairs of those too.
The other challenge with the nylon fabric is its propensity to fray almost immediately after being cut. We purchased a product called “Fray Check” from Wal-Mart for about $3 per bottle (Jo-Ann also sold it for a higher price), which is essentially a little bottle of adhesive (similar to super glue) that we applied to all of the cut edges. The bottle comes with a tip that slides along both sides of the fabric and the glue squirts out into the fibers along the edge, binding them together and preventing fraying. We went through about 3 bottles of the Fray Check for our 12 snowmen.
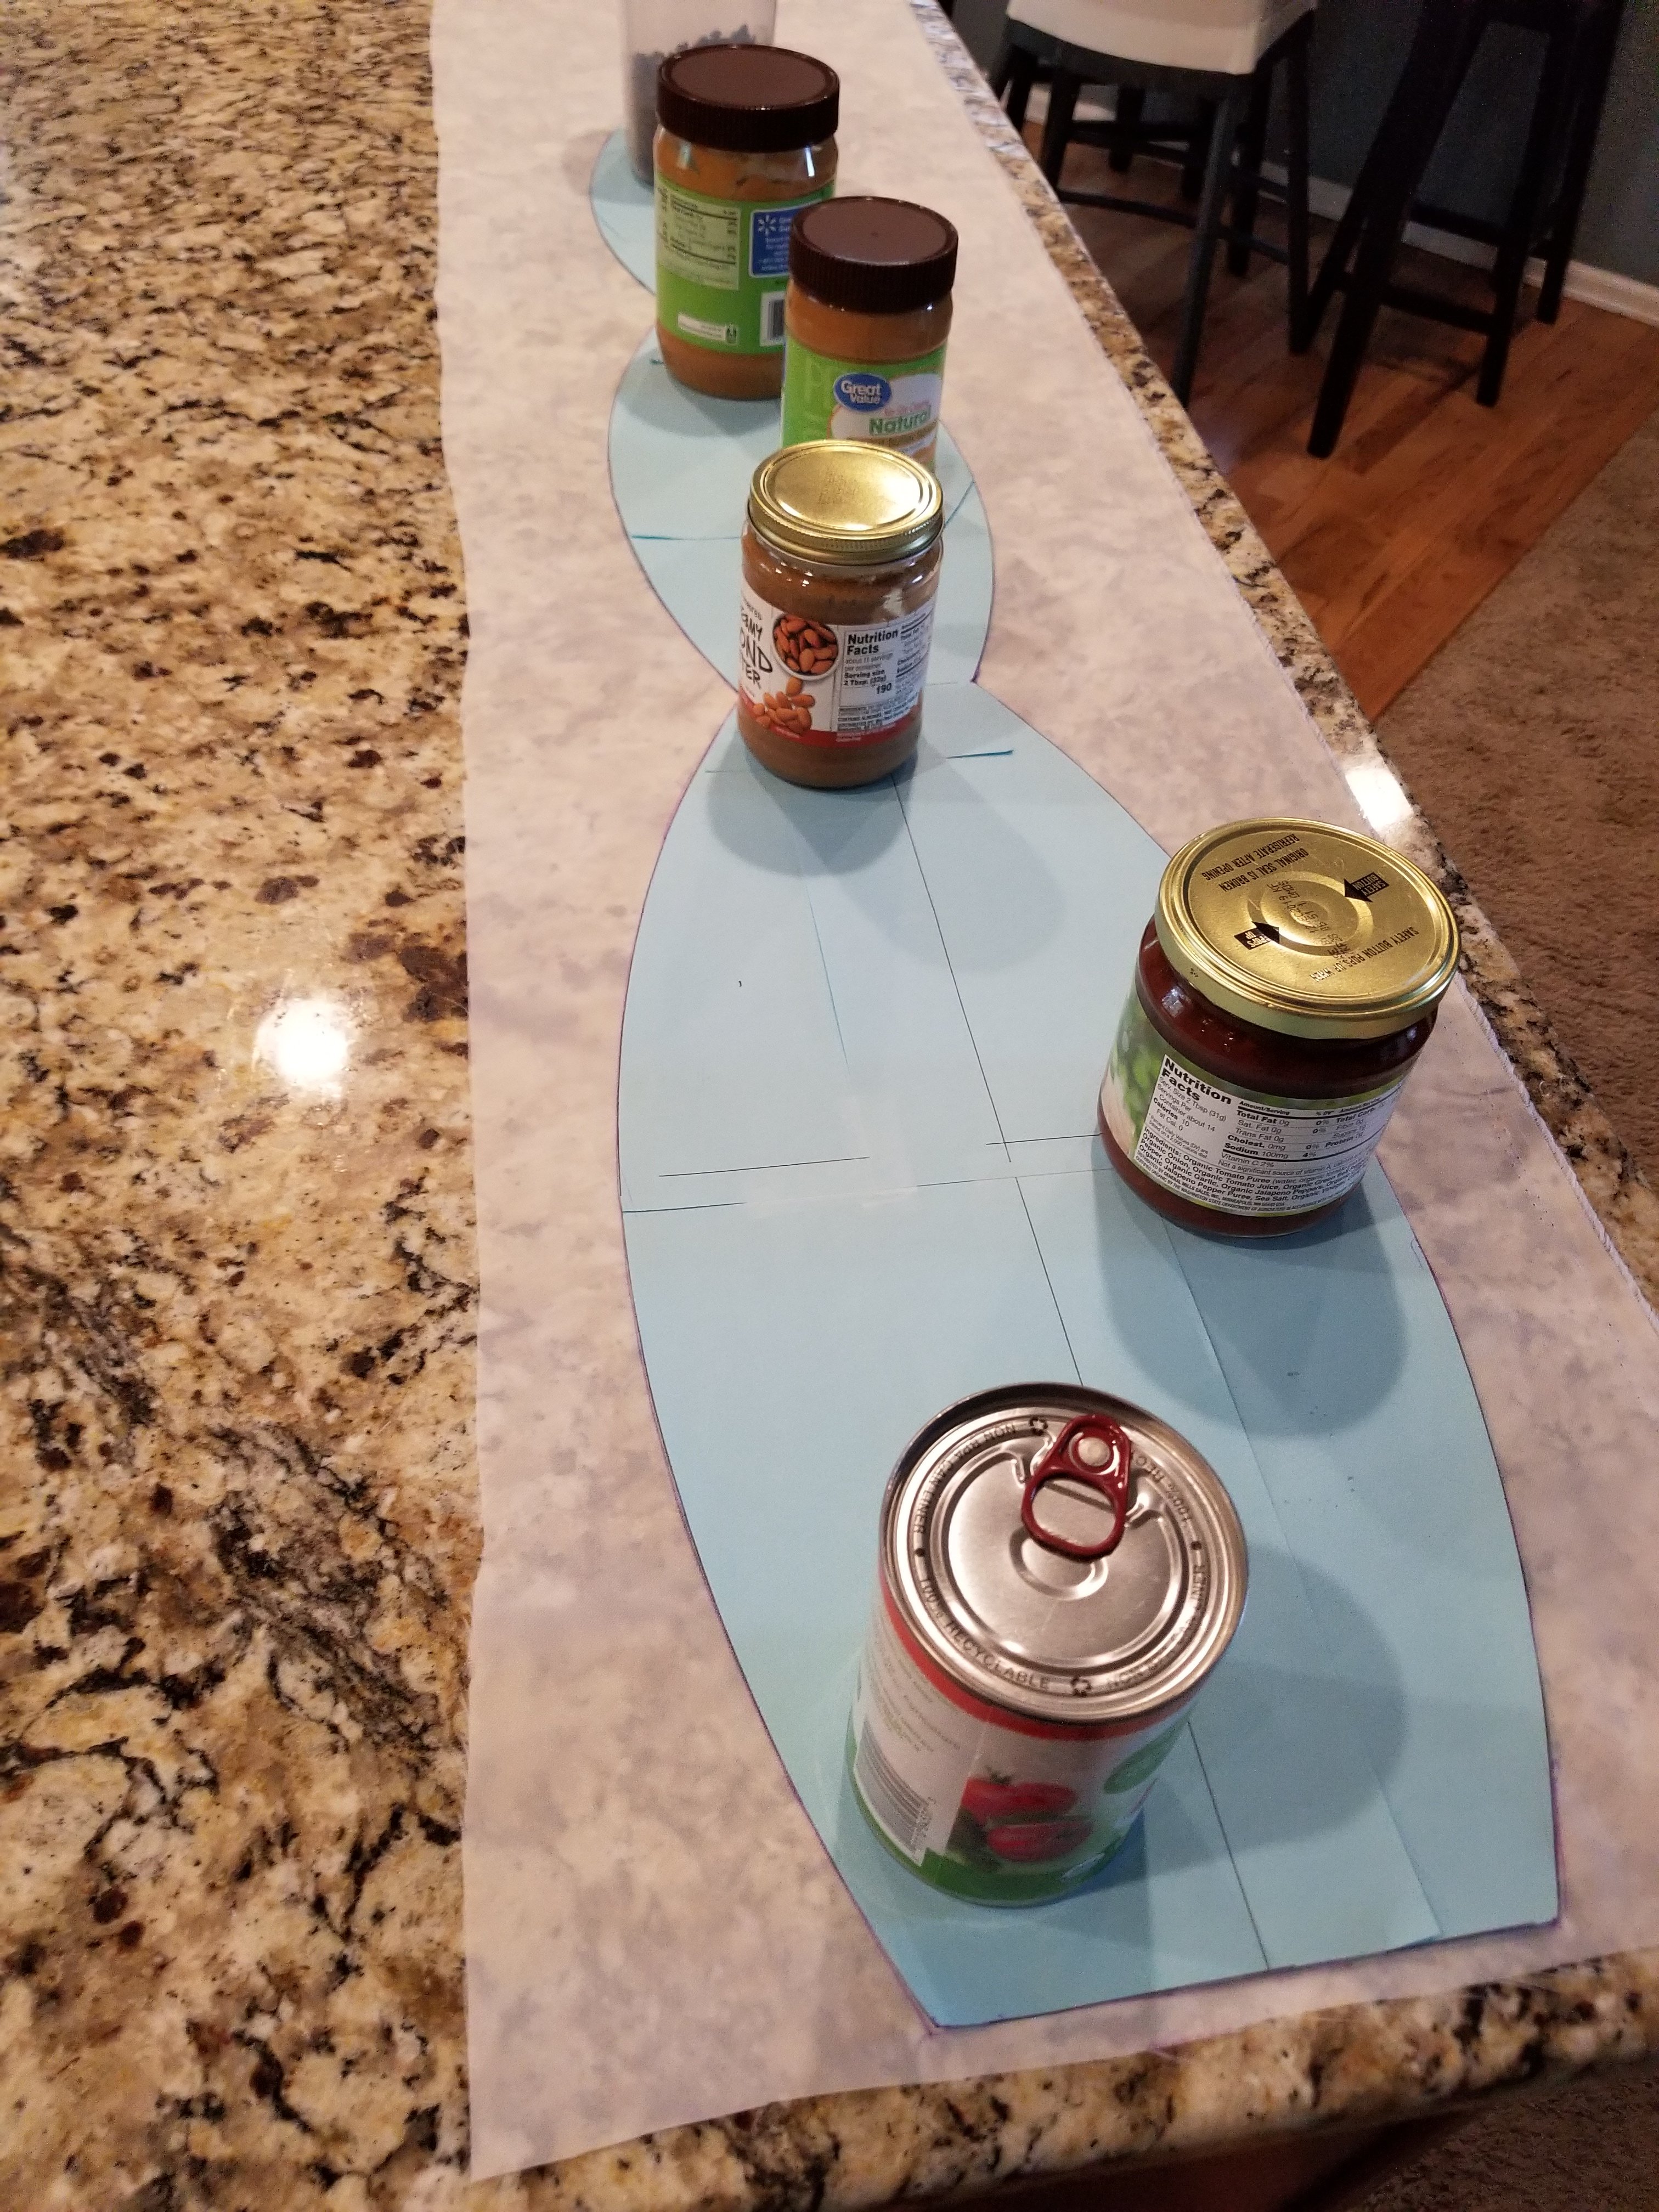
Ultimately, we cut 68 of the inner panels and 24 of the outer panels while standing at the kitchen island for many hours over several nights. It is a tedious process to trace the template onto the fabric using a disappearing fabric marker, cut the panel out, and then apply the fray check. We would typically trace the template about 4 times, then cut each of those panels out. In a good night, we would do that 3 times, yielding 12 panels, and then apply the fray check to each, hanging the panels over baby gates or chair backs to dry.

Sewing the Uniforms
With cutting complete, the sewing adventure began. We used 100% nylon thread in our entry-level sewing machine and stitched the panels together with a straight stitch at a 1/4″ seam. We pinned the two panels being sewn together so they stay lined up correctly using about 20 pins along the height of the panel. It is important to start sewing at the bottom of the snowman and finish at the head to ensure all the panels join together at a single point on top of the skull. We did this backwards (starting at the head and going to the base) on a few of the panels and they don’t join as perfectly as we would like at the top.
Once the uniforms were sewn, the final step was to attach plastic snaps along the edges so the uniform can be cinched around the snowman skeleton. We used white plastic snaps that we originally purchased for use with cloth diapers and these worked very well. Five snaps for the bottom ball, four for the middle ball, and three for the top ball seems to work pretty well (though using four for the top ball might be better). We also added a small square of extra fabric (1/2″ square) when attaching each of the snaps to help prevent the snap from ripping through the material.
Illuminating the Snowmen
LED Light Stick
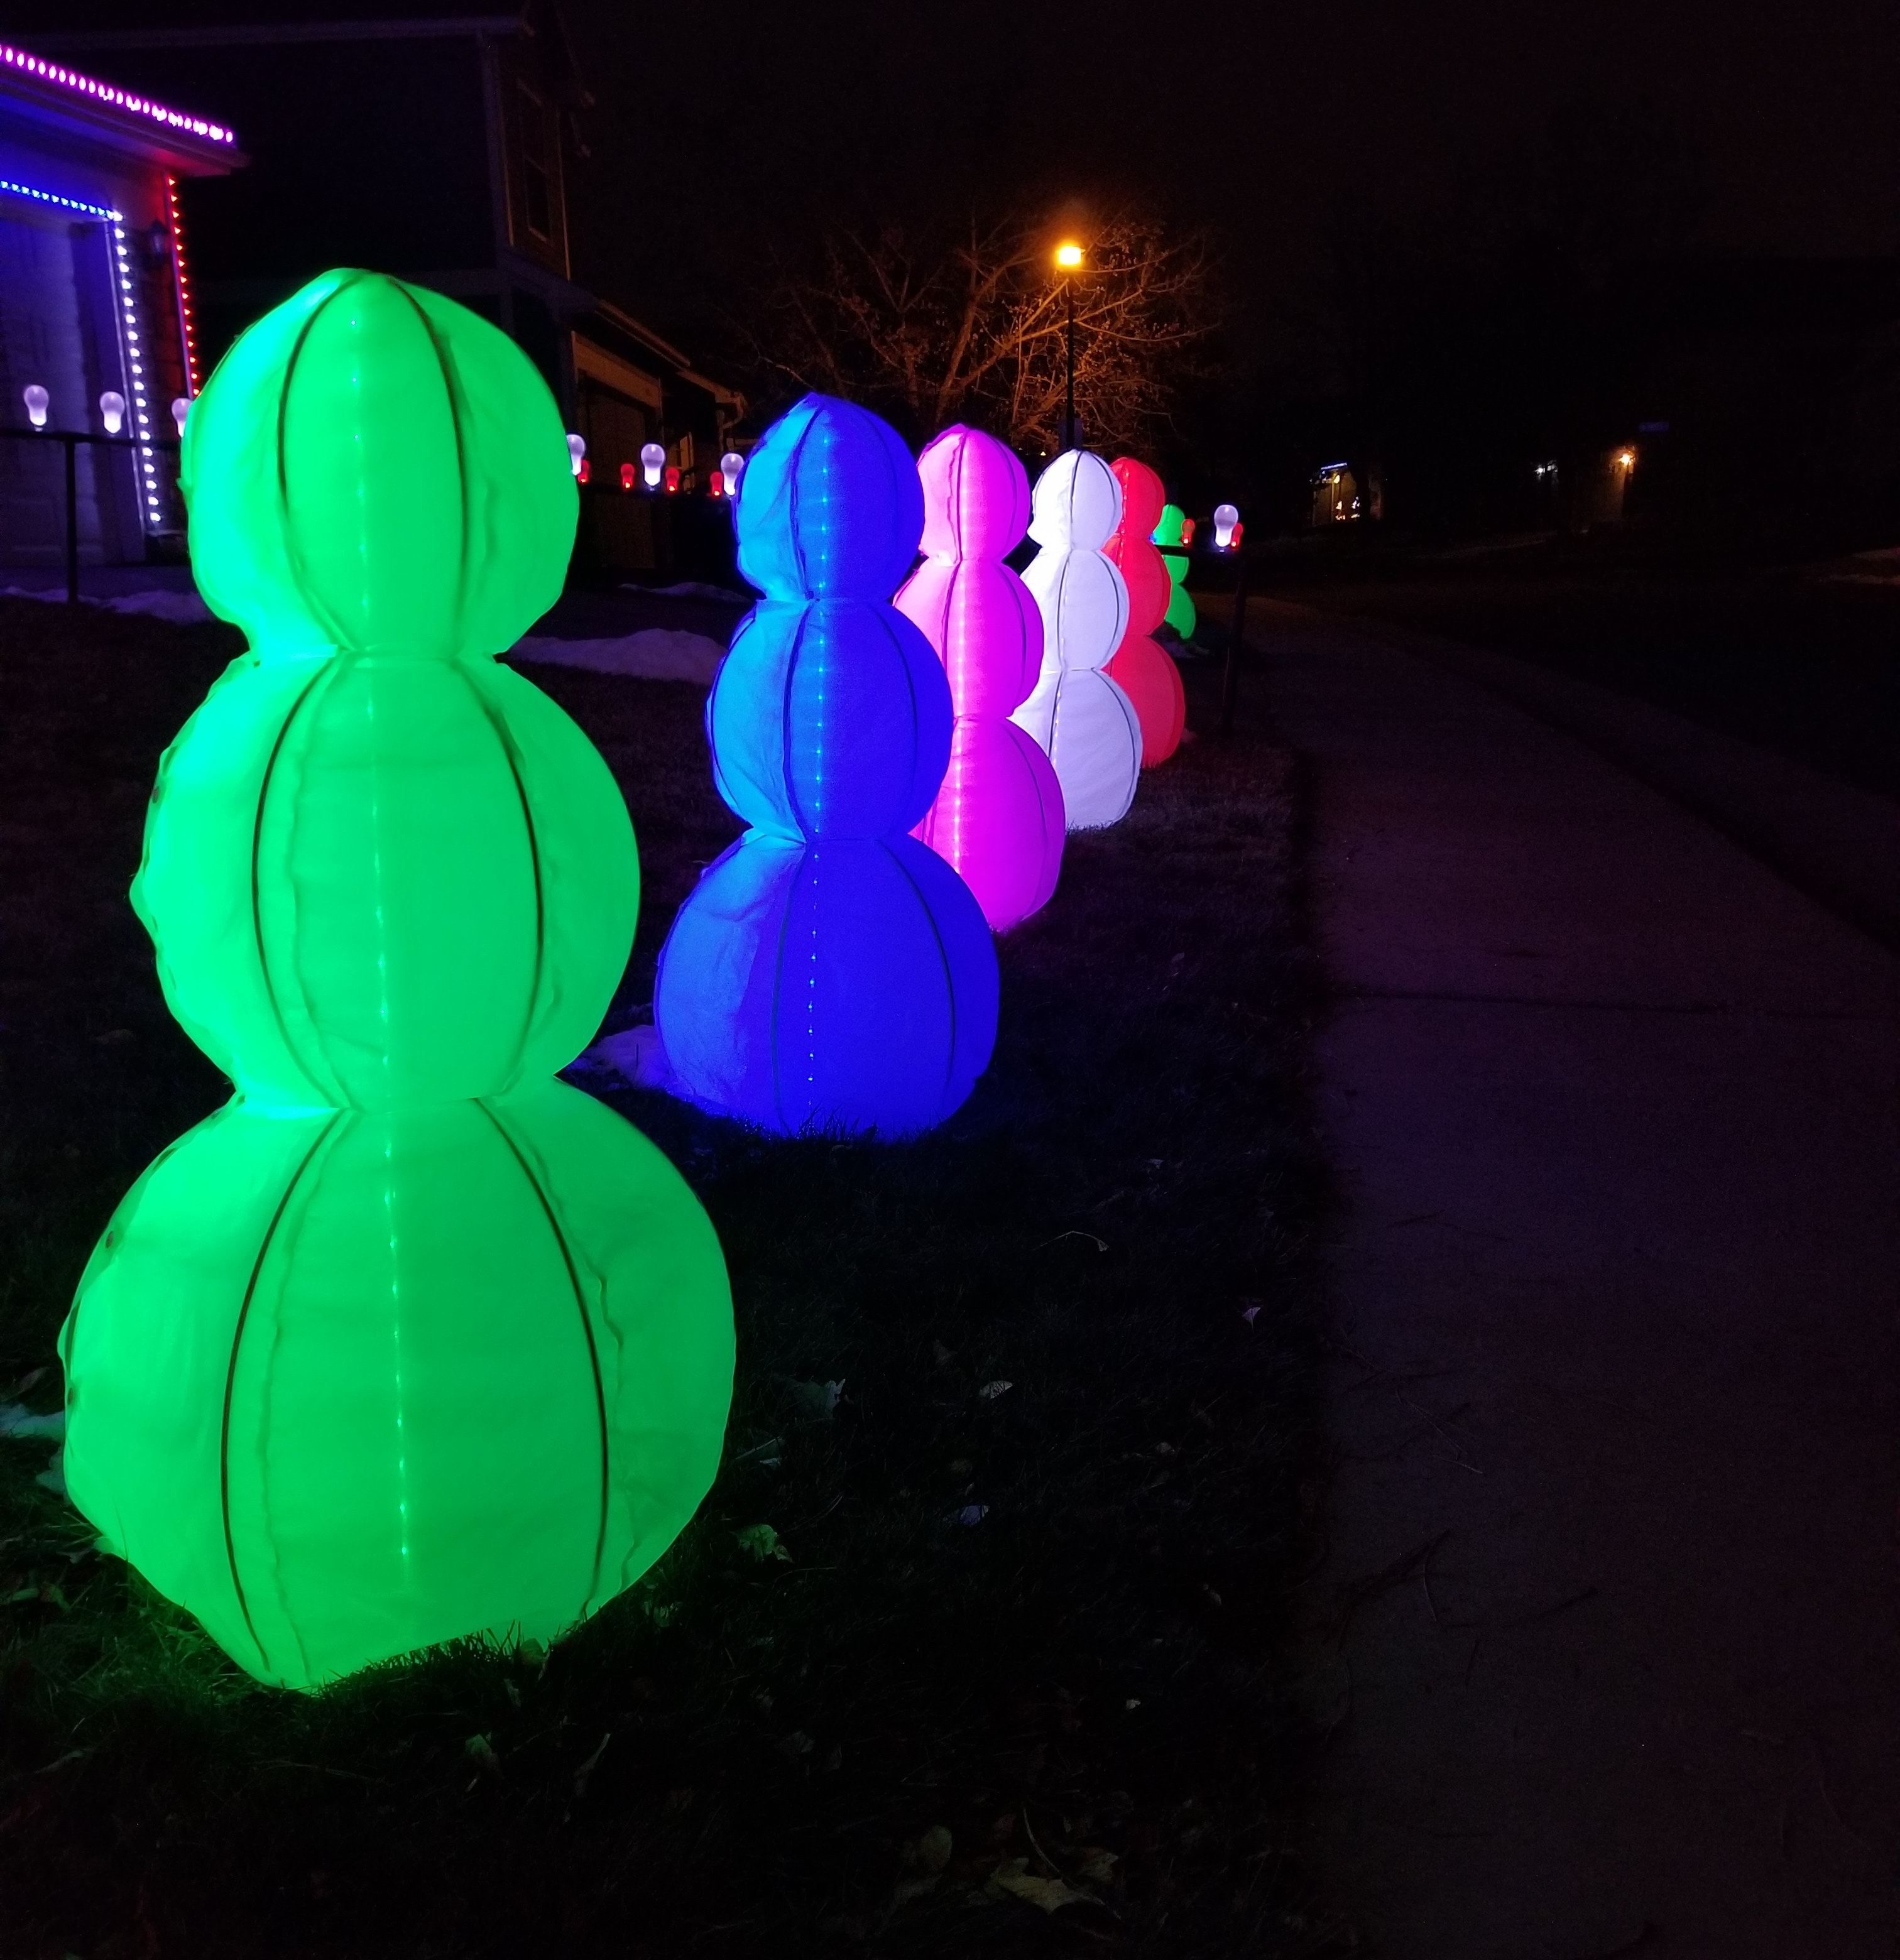
The snowmen are illuminated by waterproof LEDs centered in their bodies (snowman enema?). These are the same 12V IP65-rated 30 led/meter (10 pixels/meter) strips of pixels we used for the original LED Snowmen. Details about all of our different pixels are on LED Pixels. We spent about $40 on enough pixels for all 12 snowmen and were able to reuse the same connectors previously used with the old snowmen.
The pixels are mounted on a 3 foot length of 3/4 inch PVC pipe.We use 18 pixels for each snowman (54 LEDs since 12V pixels have 3 LEDs per pixel) with 9 running from base to head and another 9 returning from head back to base. We stuck the pixel strips to the PVC using the pixel strips’ adhesive backing and then added 5 zip ties to hold the strips tight over time.

As a final step, we used copious amounts of silicone caulk to cover the exposed solder joints where we attached the connector and where we joined the strips at the top. We actually didn’t use enough caulk at first and discovered a few snowmen unexpectedly shining bright in the middle of the night after a light snowfall. Presumably, moisture caused some bridging between power and data lines, causing the snowmen to illuminate. We added another round of caulking to those bottom connections, making sure to get caulk underneath the wires as well as on top and this seems to have solved the problem.
Assembling the Army in the Yard
To assemble the army, we use three tent stakes to firmly hold down the base of each snowman. The light stick is then maneuvered into the middle of the snowman with the LEDs facing away from the street. This will cause the snowman to glow when viewed from the street, without seeing the hotspots of the individual LEDs. The small post on the underside of the skull slides inside the PVC pipe and keeps it from leaning to the side. We were originally planning on also sliding the bottom of the light stick onto a piece of rebar driven into the grass but there really is no need as holding it from the top is sufficient. Finally, we dress each snowman in his uniform and snap it into place, ensuring that the seams between panels line up nicely with the ribs.
Wiring Up the Army
We use a data bus approach for connecting the snowmen together with a main cable carrying power and data running along the ground at the front of our yard and each snowman plugging into that cable with a 4 pin connector. 3 pins are for the standard 12V power, ground, and data line to the snowman, and the 4th pin connects the return data line back to the bus for delivery to the next snowman.


The 9 snowmen to the left of the driveway are powered by a single 12V 30A power supply that lives in the bomb box in the front yard. We have one point on the snowman bus for doing power injection so that snowmen at the end of the line get enough power. This same power supply also powers the light bulb rail on the same side of the driveway.

The 3 snowmen to the right of the driveway are powered by a different 12V 30A power supply that lives in the garage. Similarly, this supply powers the light bulb rail on that side of the driveway. Due to fewer pixels on this side, we found that no power injection was required.

Controlling the Snowmen
The light bulb rail and its corresponding snowmen on the tree side of the driveway are controlled by an ESPixelStick Pixel Controller. The mailbox side is controlled by a Sandevices E682 Pixel Controller. Each side of the driveway is its own universe.
