At some point, you have to get your beautiful light show out of the sequencing software and actually displaying on the house. This isn’t a hard task but can be tedious and annoying to troubleshoot if you get it wrong. Here is our master output table and some screenshots / explanations of each of the steps involved in making the display come to life.
You can also find our actual Vixen files in our Github.com repository. Feel free to learn from these as you set up your own show. If you find yourself using our files in a significant way without major alteration, please consider giving Broomfield Lights a shout-out somehow and pointing people towards this website.
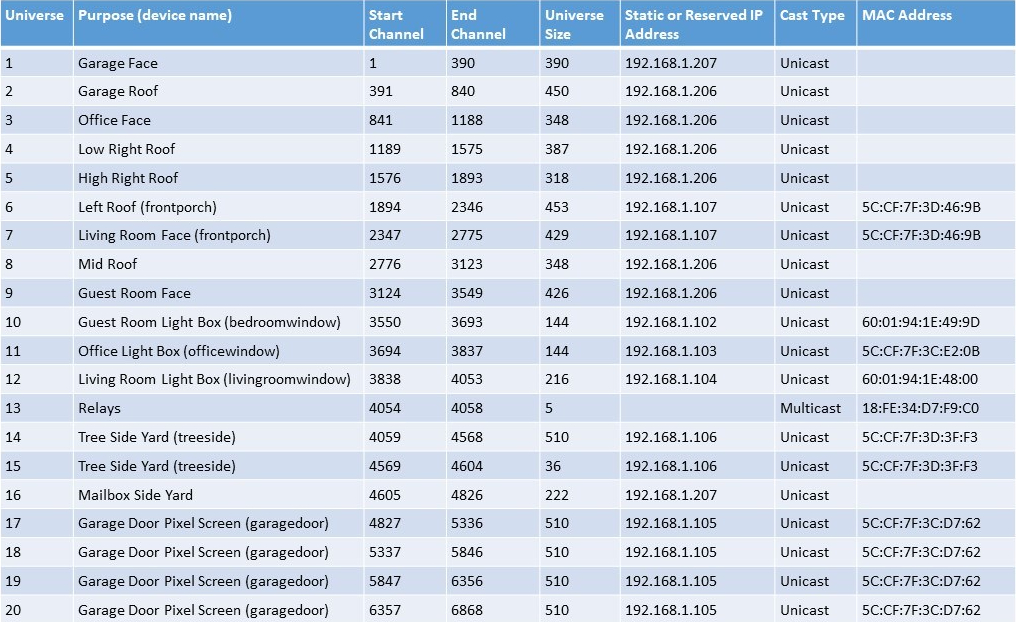
Master Mapping Table
This table is mostly here as a reference for us. It contains a bunch of information consolidated into a single location to easily find if needed.
Output Mapping in Vixen
The intent here is not to rewrite the documentation for how to use Vixen Lights. In general, the web documentation for it is sufficient if you just take the time to read through it. Instead, here are some visual representations of our pixel strings and how we have them mapped using Vixen. Everyone’s display is of course different but this gives an example of how we do things.
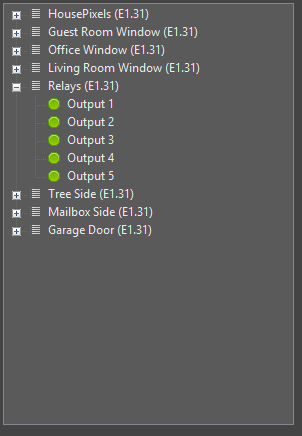
Note also that we do not use Vixen at all to execute the show and thus have not setup any of the actual controller logistics in the software. The desired output for us from Vixen is just a sequential list of channel numbers with the instructions for each channel at any given time. Any mapping of those channels to physical controller hardware takes place in Falcon Player. That said, it is helpful for keeping things straight to define multiple “pseudo controllers” in Vixen rather than just defining a single 6000+ channel controller but there is no direct relationship between how the channels in Vixen are spread across the pseudo controllers vs. how they are actually mapped in Falcon Player. Ultimately, Falcon Player is king.


Make sure to set the color handling of each of the pixels before mapping them to the pseudo controllers. By default, each lighting element takes one channel. This is perfect for old-school light strings controlled by relays but pixels require one channel each for red, green, and blue. When you set the color handling to be pixels, Vixen knows that each pixel requires three channels and you can then map that appropriately to the pseudo controllers.
One other note: each lighting element can also have a dimming curve defined. This is useful for the perfectionists among us who can actually notice the brightness differences between different LEDs. More practically for us, it allows us to lessen the brightness of the pixels on the verticals. At 100% brightness, the pixels shining directly in your eyes are just too much and it is overwhelming. We assigned a dimming curve that goes linearly from 0% to 75% for these pixels and this has the effect of rescaling the sequenced values such that they max out at 75% brightness.
Location-Based Effects
It took until 2017 for us to figure out how location-based effects work in Vixen. Location-based effects are where the software uses the preview picture to determine the relative spatial relationship between pixels and can then apply effects appropriately. Prior to 2017, we tended to work with each string of lights individually and Rose spent a lot of time sequencing some of the wipe effects. Other effects like the pinwheel were not even realistically possible to do by hand that way.
It turns out, location-based effects are really simple to use and they open up a lot of possibilities for us. The trick is defining display groups that contain all of the elements for which the effect should apply. Thus, we now have numerous defined groups such as “All” (includes every pixel we have) and “Snowmen” (all 12 of the snowmen). By applying one of the location-based effects (such as pinwheel) to the group, Vixen does all the hard work of figuring out when each pixel needs to be on or off.
Exporting from Vixen
Exporting a sequence from Vixen is a simple process. Just open the sequence and go to Sequence -> Export. We have found that the export tends to go better if you first close out of Vixen completely first and then make opening the sequence and exporting it your first task. This may have gotten better in recent versions of Vixen but we noticed significant issues in 2016 with our exports if Vixen had been open for a while or we had done anything with it prior to exporting.
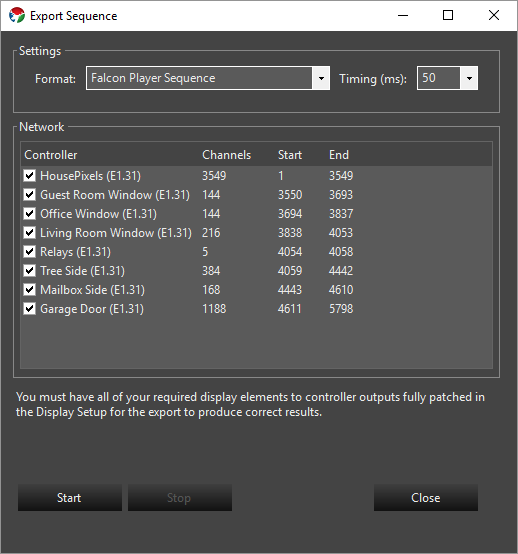
On the export dialog, use the “Falcon Player Sequence” format and we have always left the timing at the default 50 milliseconds. You can rearrange or turn off pseudo controllers in this dialog but life is just simpler if you define them originally in the desired order and don’t mess with anything here. Once the export completes, you can upload that sequence to Falcon Player and see it in action on the house.
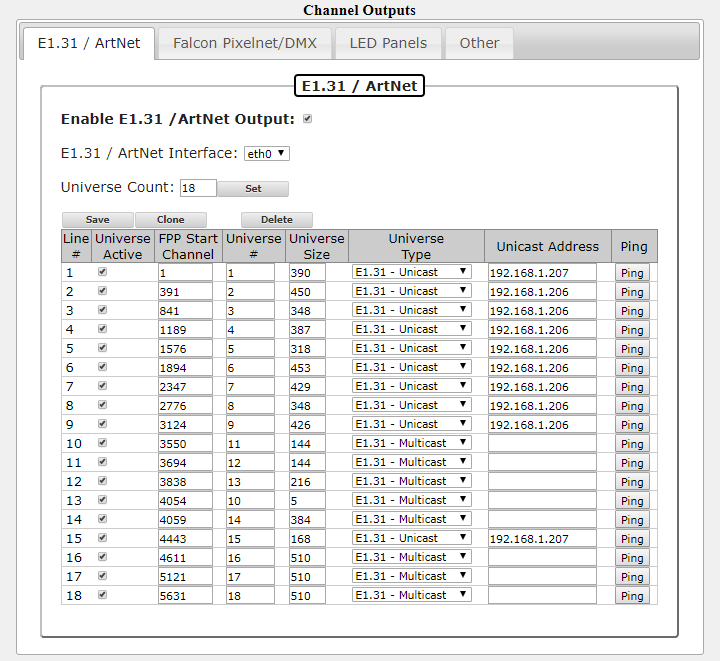
Output Mapping in Falcon Player
The final step is to map each channel to a specific controller so that Falcon Player knows how and where to send each data packet. Check out the section on unicast vs. multicast on the Network and Router page for some discussion on the differences between those two methods. Here is the output mapping we have in Falcon Player to map our 6000+ channels to their universes and controllers.